How to Grow Wheat: Planting, Care, and Harvest Guide
Learning how to grow wheat starts with choosing the right variety and planting season. Wheat can produce edible grain in a small garden or a commercial field. However, planting dates, seed rates, soil conditions, and harvest methods differ by region.
Grow wheat by sowing locally adapted winter or spring wheat seeds about 1 to 1½ inches deep in well-drained soil. Provide adequate moisture, control weeds, and harvest when the grain heads turn golden and the kernels become hard and dry.
What Type of Wheat Should You Grow?
Choose wheat according to your climate, planting season, and intended grain use.
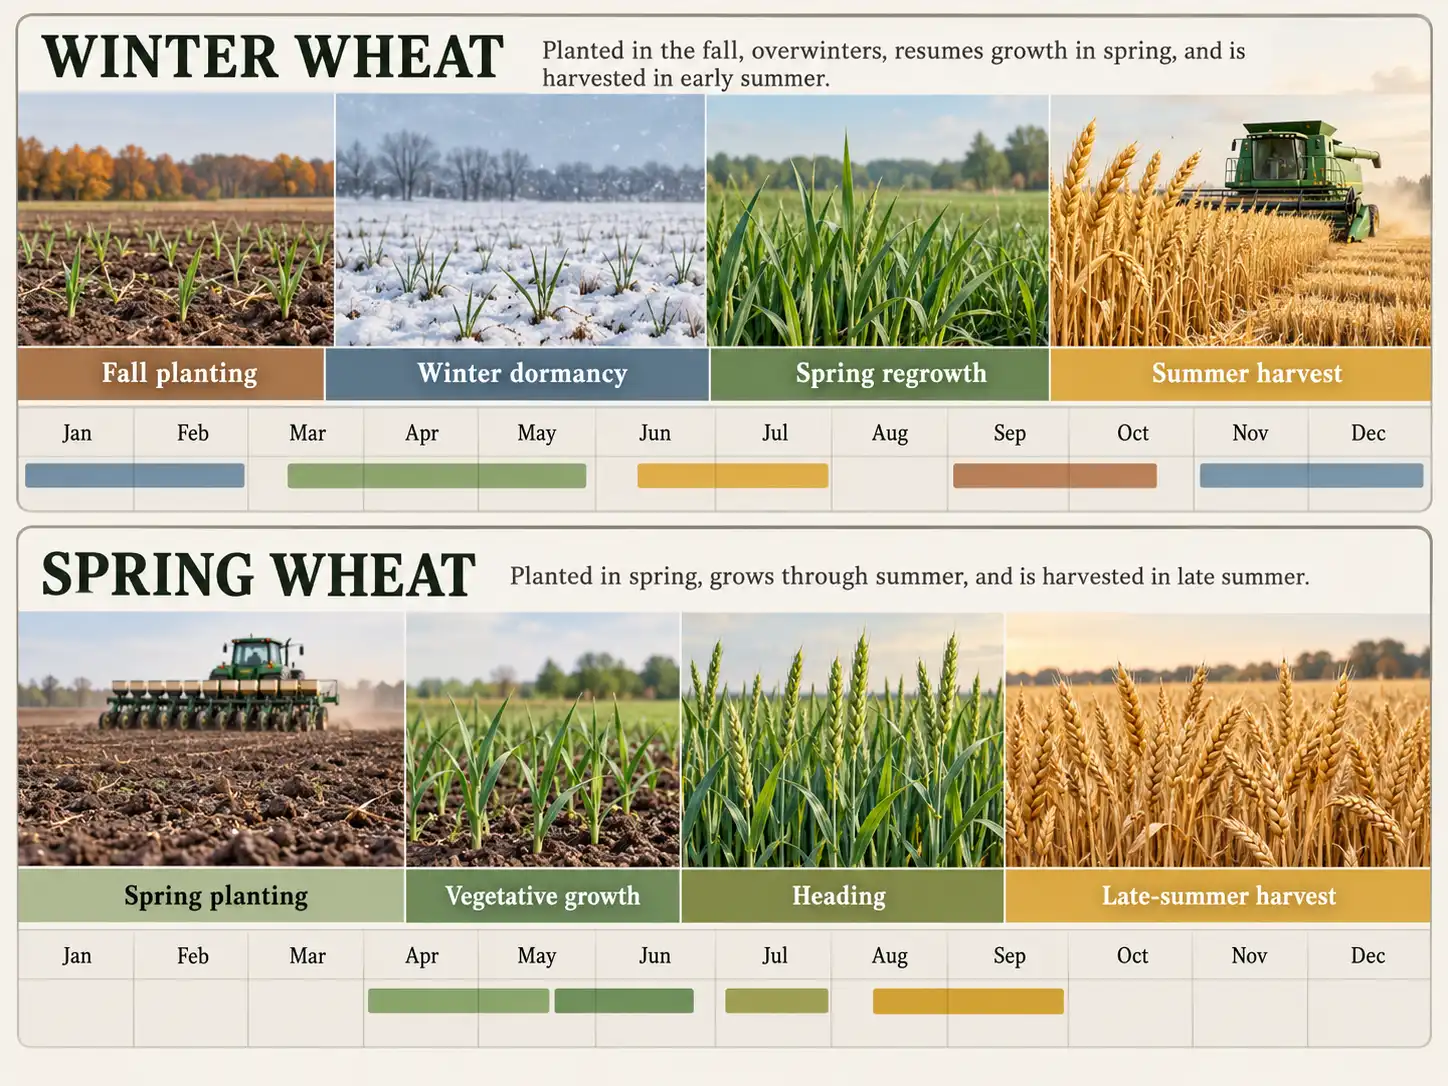
Winter wheat grows through the cold season. Spring wheat completes its life cycle without winter dormancy.
According to the USDA Economic Research Service, wheat classes also differ in kernel hardness, protein characteristics, growing regions, and milling uses.
| Wheat type | Planting season | Main growing region | Common use |
|---|---|---|---|
| Hard red winter | Fall | Great Plains | Bread flour |
| Hard red spring | Spring | Northern Plains | High-protein bread flour |
| Soft red winter | Fall | Eastern and southeastern states | Cakes, biscuits, cookies |
| White wheat | Fall or spring, depending on variety | Pacific Northwest and other regions | Noodles, crackers, bread |
| Durum | Usually spring | Northern Plains | Pasta and semolina |
Winter wheat requires sufficient cold exposure, called vernalization, to complete normal reproductive development. Spring wheat does not have that requirement.
For bread flour, hard red winter and hard red spring wheat are common choices. Soft wheat is generally better suited to tender baked goods.
Choose a locally adapted variety within your preferred class. Compare disease resistance, maturity, winter survival, and recent local variety trials before purchasing seed.
When Is Wheat Planted in the United States?
Winter wheat is planted in fall, while spring wheat is planted as soon as field conditions permit in spring.
The correct planting date depends more on regional temperatures than on the USDA plant hardiness zone alone.
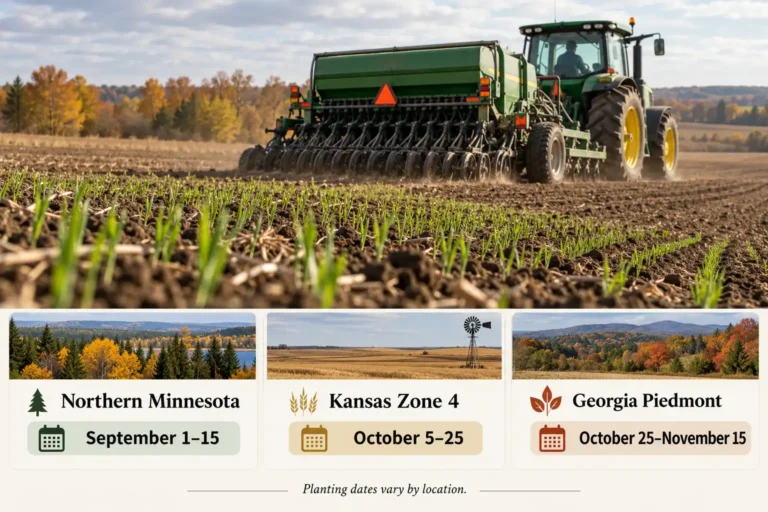
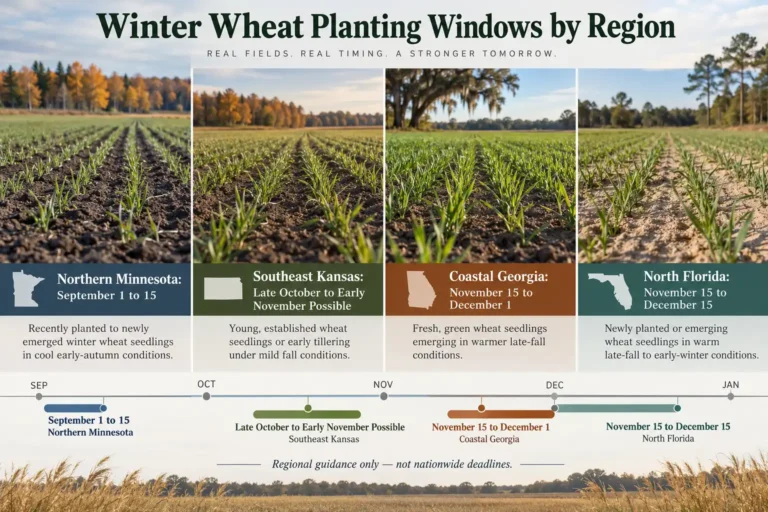
The following windows come from University of Minnesota Extension, K-State Research and Extension, and University of Georgia Cooperative Extension.
| Region | Wheat type | Approximate planting window |
|---|---|---|
| Minnesota, winter wheat areas | Winter | September 1 to October 10, depending on latitude |
| Minnesota and nearby northern spring wheat areas | Spring | Early April to early May, depending on latitude |
| Kansas | Winter | September 10 to October 25, depending on planting zone |
| Pennsylvania | Winter | Early September to late October |
| Georgia | Winter | October 15 to December 1, depending on region |
| Northern Florida | Winter | November 15 to December 15 |
These are regional references, not interchangeable planting recommendations.
In northern states, earlier fall planting helps winter wheat establish before freezing weather. Farther south, later planting reduces excessive fall growth and some pest risks.
For spring wheat, the University of Minnesota recommends planting early once conditions allow. Spring wheat begins germinating readily when soil temperatures reach approximately 40°F.
Planting too late can expose flowering and grain filling to excessive heat.
Where Does Wheat Grow Best?
Wheat performs best in full sunlight, well-drained soil, and a climate that provides cool growing weather.
Choose an open site without significant shade or persistent standing water.
Soil conditions
Wheat grows well in fertile loam, although suitable sandy and clay soils can also support production.
The University of Georgia Cooperative Extension identifies soil pH 6.0 to 6.5 as a favorable range for southeastern wheat production.
Before planting:
- Collect a representative soil sample.
- Check pH, phosphorus, potassium, and other locally recommended measurements.
- Apply lime only when the soil test recommends it.
- Correct drainage problems and compacted areas.
- Remove established weeds before seeding.
Use a soil test rather than guessing at fertilizer needs. Understanding soil test results and nutrient recommendations helps prevent unnecessary applications.
For home plots, prepare a level, firm seedbed. Break large clods, but avoid pulverizing wet soil.
For larger fields, conservation tillage or no-till seeding can preserve residue and reduce soil disturbance.
Can You Grow Wheat From Wheat Berries?
Yes. Whole, viable wheat berries can produce wheat plants because each berry is a wheat kernel containing an embryo.
However, food-grade wheat berries are not automatically suitable planting seed.
For more dependable establishment, choose clean planting seed with known variety identification and germination information.
Test wheat berries before planting
You can check whether a small batch will germinate.
- Count 50 untreated, whole wheat berries.
- Place them between moist paper towels.
- Put the towels inside a partially closed plastic bag.
- Keep them at room temperature and inspect regularly.
- Count healthy seedlings after approximately one week.
For example, 45 healthy seedlings from 50 kernels indicate 90% germination.
Freshly harvested wheat can remain temporarily dormant. K-State Research and Extension recommends special pre-chilling procedures when testing newly harvested wheat.
Avoid using cracked, cooked, or heat-damaged grain for planting.
Chemically treated planting seed must not enter food or feed supplies. The U.S. EPA explains the labeling and restrictions for pesticide-treated seeds.
How to Grow Wheat From Seed: Step by Step
Direct seeding is the standard method for growing wheat. Transplanting individual wheat seedlings is unnecessary.
Step 1: Prepare the planting area
Clear weeds and large debris. Make the soil firm enough to support even seed placement.
Avoid planting in saturated ground.
Step 2: Mark the rows
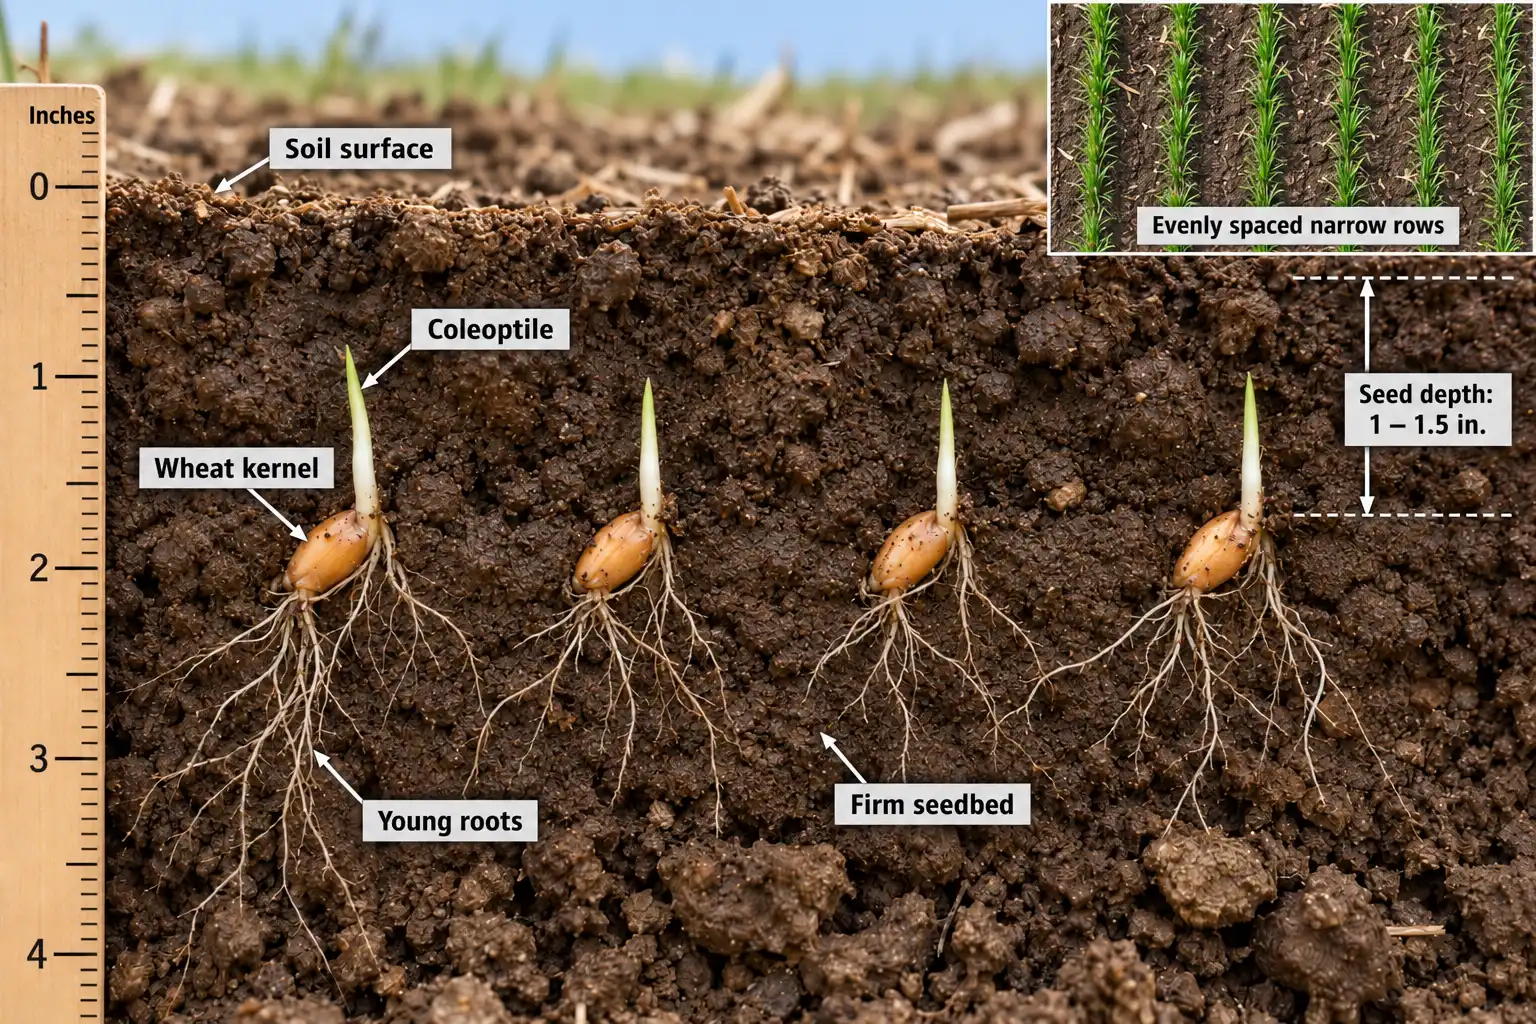
For a garden plot, use narrow rows approximately 6 to 8 inches apart.
Commercial grain drills commonly use row spacing near 7.5 inches.
Step 3: Measure the seed
Calculate the amount of seed needed for your area before planting.
Wheat is planted much more densely than crops such as corn or beans.
Step 4: Sow at the correct depth
Place most wheat seed 1 to 1½ inches deep in moist, prepared soil.
Some regional guidance allows planting near 2 inches when needed to reach moisture. However, deeper sowing can reduce emergence, particularly in varieties with shorter coleoptiles.
Step 5: Cover and firm the soil
Cover the seed evenly and lightly firm the surface.
Good seed-to-soil contact supports moisture absorption and germination.
Step 6: Check emergence
Under favorable spring conditions, wheat may emerge within 8 to 10 days.
Cooler soils, dry weather, and deeper sowing can delay emergence.
How Much Wheat Seed Do You Need Per Acre or Garden Bed?
Calculate wheat seeding rates from the desired plant population, germination percentage, and expected establishment losses.
The University of Minnesota Extension recommends approximately 21 to 23 established plants per square foot for winter wheat and 30 to 32 for spring wheat in its production system.
Southern wheat recommendations can differ. University of Georgia guidance uses approximately 35 planted seeds per square foot for grain wheat.
| Production system | Seeding reference |
|---|---|
| Minnesota winter wheat | 21 to 23 established plants/sq. ft. |
| Minnesota hard red spring wheat | 30 to 32 established plants/sq. ft. |
| Southeastern winter grain wheat | About 35 planted seeds/sq. ft. |
Calculate the planting rate:

Suppose you want 22 established plants per square foot, with 95% germination and 90% establishment.
You would sow approximately 26 seeds per square foot.
That equals about 823 kernels for a 4-by-8-foot bed, or 75 lb/acre if your seed lot contains 15,000 kernels per pound.
Seed size varies, so weigh or count your actual seed lot rather than relying on a universal pounds-per-acre rate.
How Often Should You Water Wheat?
Wheat needs sufficient soil moisture to establish roots, produce grain heads, and fill kernels.
However, irrigation needs depend on rainfall, soil water storage, temperature, and growth stage.
After planting
Keep the seed zone moist until seedlings establish. Avoid prolonged saturation because poorly drained soil can damage roots.
During vegetative growth
Established wheat can use stored soil moisture. Check conditions below the dry surface rather than watering on a fixed schedule.
During heading and grain filling
Moisture stress during reproductive growth can reduce kernel number and weight.
If irrigation is available, give these stages particular attention.
Before harvest
Reduce unnecessary irrigation as grain approaches maturity. Dry weather supports harvest and drying.
For field-scale irrigation, use rainfall records and soil moisture measurements. The method for calculating crop water requirements can help estimate irrigation needs without assuming every wheat field requires the same amount.
How Should You Fertilize Wheat?
Wheat needs nitrogen, phosphorus, potassium, and several other nutrients, but fertilizer rates should follow soil tests and realistic yield goals.
Nitrogen supports leaf growth, tillering, and grain protein development. However, excessive nitrogen can increase lodging, where wheat stems fall over before harvest.
When to apply nutrients
- Before planting: Correct soil pH and apply soil-test-recommended phosphorus and potassium.
- At planting: Apply an appropriate portion of nitrogen when needed for establishment.
- Late winter or early spring: Topdress winter wheat based on stand condition, previous nutrient applications, and local recommendations.
- Before rapid stem elongation: Complete major nitrogen applications according to the regional wheat fertility program.
For southeastern wheat targeting 40 to 70 bu/acre, University of Georgia guidance describes total nitrogen rates around 80 to 100 lb/acre. This is not a nationwide fertilizer prescription.
Convert fertilizer rates to a garden bed
Suppose a soil-based recommendation calls for 40 lb of actual nitrogen per acre.
A 4-by-8-foot bed requires approximately 0.47 oz of actual nitrogen.
A fertilizer containing 10% nitrogen would require about 4.7 oz of product to supply that amount.
This is an arithmetic example, not a planting recommendation. A balanced fertilizer may add phosphorus or potassium that the soil does not need.
Maintaining soil fertility through appropriate amendments can support wheat growth without unnecessary nutrient applications.
Wheat Growth Stages: What Happens After Planting?
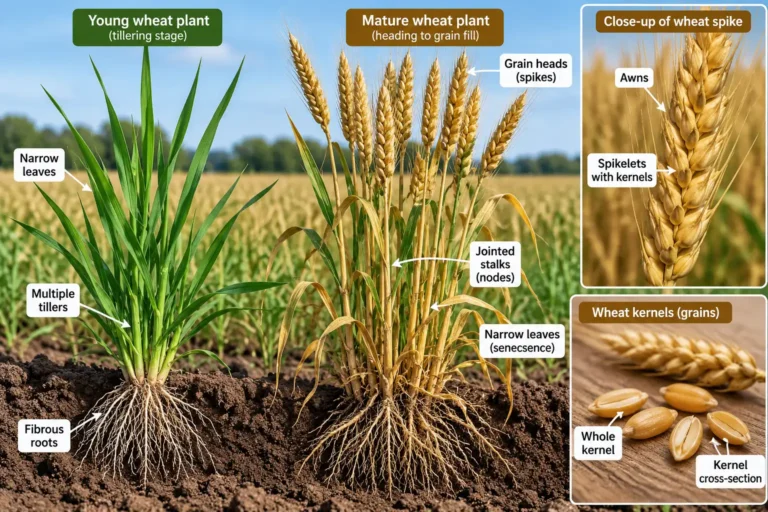
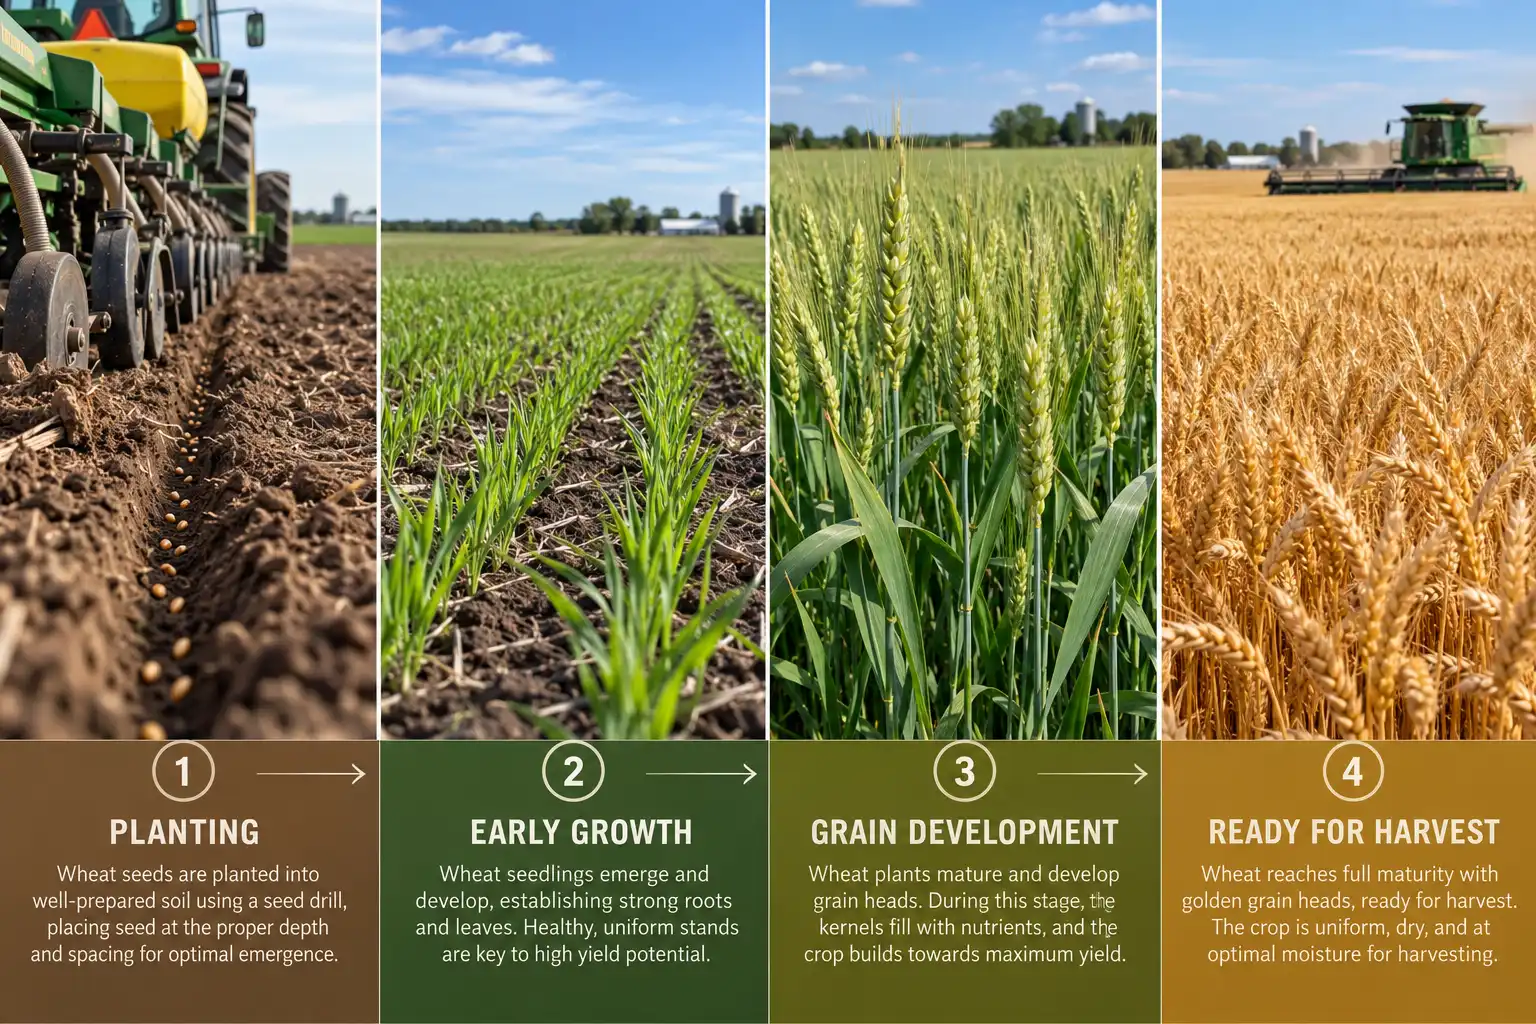
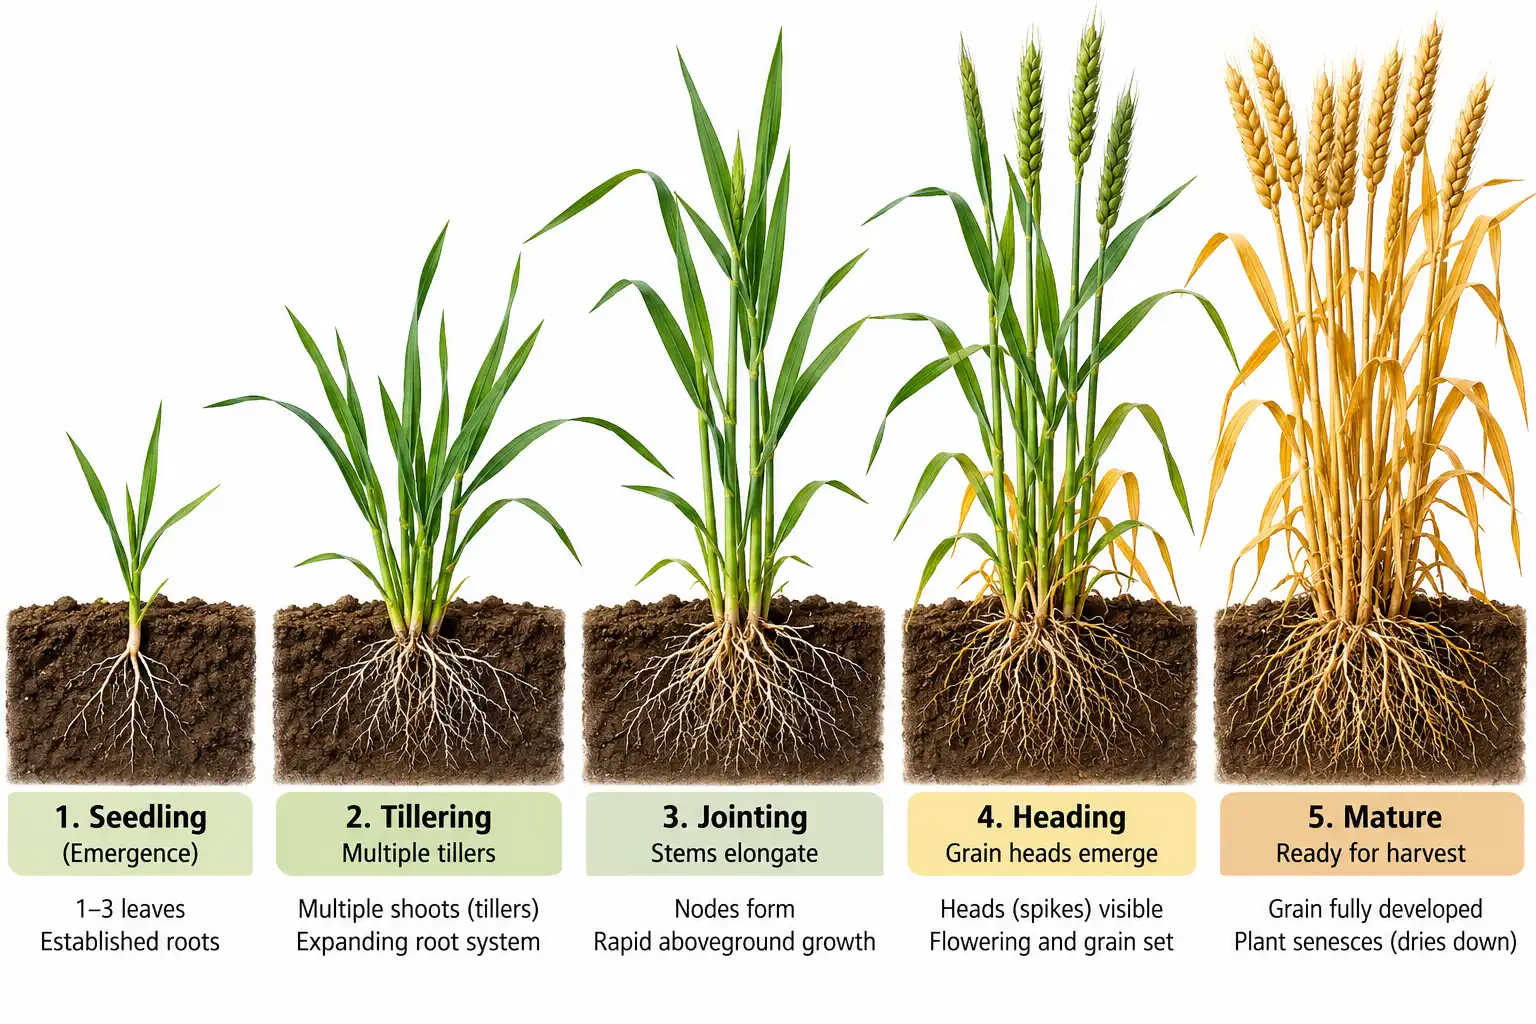
Wheat grows through recognizable stages, from seed emergence to mature grain.
Knowing the stages makes watering, fertilization, and pest scouting more accurate.
| Growth stage | What you will see | Main management concern |
|---|---|---|
| Germination | Roots and first shoot develop | Seed-zone moisture |
| Seedling | Young grasslike leaves emerge | Establishment and weeds |
| Tillering | Additional shoots grow from the plant base | Stand density and nitrogen |
| Jointing | Stems lengthen and nodes become detectable | Water and nutrient supply |
| Boot and heading | Grain heads develop and emerge | Water stress and diseases |
| Flowering | Pollination occurs | Fusarium head blight risk |
| Milk and dough | Kernels fill and harden | Moisture and healthy leaves |
| Ripening | Heads and straw lose green color | Grain moisture and harvest |
Winter wheat typically establishes in fall, enters winter dormancy, and resumes growth in spring.
Spring wheat progresses through these stages within one growing season.
The University of Minnesota Extension’s spring wheat development guide explains that grain filling begins after flowering. The kernels reach maximum dry weight before reaching harvest moisture.
How Do You Care for Winter Wheat?
Winter wheat needs adequate fall establishment and successful spring recovery.
Healthy plants develop a crown near the soil surface. The crown produces new shoots and supports regrowth after dormancy.
Poorly established plants have less protection against freezing injury and winter heaving.
Before winter
Check plant emergence, root establishment, and weed competition.
Avoid encouraging excessive fall growth with unnecessary nitrogen.
During winter
Growth slows or stops in freezing conditions. Green leaves may turn brown without the entire plant dying.
After winter
Inspect the crown and roots before deciding whether a stand is lost.
For large fields, count living plants across representative areas. Evaluate thin patches separately from the average stand.
Penn State Extension’s wheat stand assessment guidance emphasizes stand condition and growth stage when making spring management decisions.
How to Control Wheat Weeds, Pests, and Diseases
Start with clean seed, locally adapted varieties, suitable planting dates, and a weed-free seedbed.
These measures reduce risk but cannot eliminate every problem.
| Problem | Typical warning sign | First response |
|---|---|---|
| Weed competition | Broadleaf weeds or grasses overtopping young wheat | Identify weeds and act early |
| Aphids | Small insects feeding on leaves or stems | Scout and identify species |
| Wheat rust | Orange, brown, or yellow pustules | Identify rust type and assess spread |
| Fusarium head blight | Prematurely bleached head sections and shriveled kernels | Assess head infection and grain safety |
| Winter injury | Brown plants with dead crowns | Examine roots and crown tissue |
| Lodging | Stems bent or flattened | Review nitrogen, variety, and weather factors |
Avoid planting wheat repeatedly in the same plot without considering disease and weed pressure.
Crop rotation and residue management can reduce certain recurring problems.
For help separating fungal, insect, and environmental symptoms, use a field crop disease identification approach before selecting a treatment.
If pesticides are needed, use only products registered for wheat and the specific use. Follow crop-stage restrictions, application rates, and preharvest intervals on the current label.
Do not use visibly moldy or suspicious grain for food. Fusarium head blight can be associated with harmful mycotoxins, which require appropriate grain testing.
Can You Grow Wheat at Home in a Raised Bed?
Yes. A sunny raised bed or small garden plot can produce mature wheat grain.
However, wheat takes considerable space relative to the amount of grain harvested.
A 4-by-8-foot bed contains 32 square feet. It can provide a manageable area for learning planting, crop development, and manual harvesting.
For a small plot:
- Choose a spring or winter variety suited to your climate.
- Prepare a level, well-drained bed.
- Measure the seed according to the intended population.
- Sow at an even depth.
- Water when necessary and remove weeds early.
- Protect ripening heads from birds when needed.
- Harvest only after the kernels mature.
Large containers can also support wheat plants. However, soil volume, drainage, and available growing area limit grain production.
A raised bed is generally more practical than several small pots when your goal is harvesting wheat berries.
When Is Winter Wheat Harvested?
Winter wheat is typically harvested in late spring or summer after fall planting and winter dormancy.
Harvest dates vary considerably across the United States.
| Region | Typical grain harvest period |
|---|---|
| Southeastern states | May to June |
| Southern Great Plains | Late May to June |
| Kansas and nearby Central Plains | June to July |
| Pennsylvania and parts of the Northeast | July to early August |
| Northern Plains spring wheat | Late summer, commonly August into September |
Regional harvest periods can shift because of weather, variety maturity, and planting date.
How to recognize mature wheat
Look for three main signs:
- Most stems and heads have changed from green to golden or straw-colored.
- The kernels are firm and difficult to dent with a thumbnail.
- Grain moisture has declined toward a suitable harvest level.
For combining, the University of Minnesota Extension identifies approximately 13% to 14% grain moisture as a useful harvest range when avoiding additional drying.
Color and kernel hardness help identify readiness, but they cannot accurately measure moisture. Use a calibrated grain moisture meter for field-scale harvest and storage decisions.
How to Harvest Wheat and Collect Wheat Berries
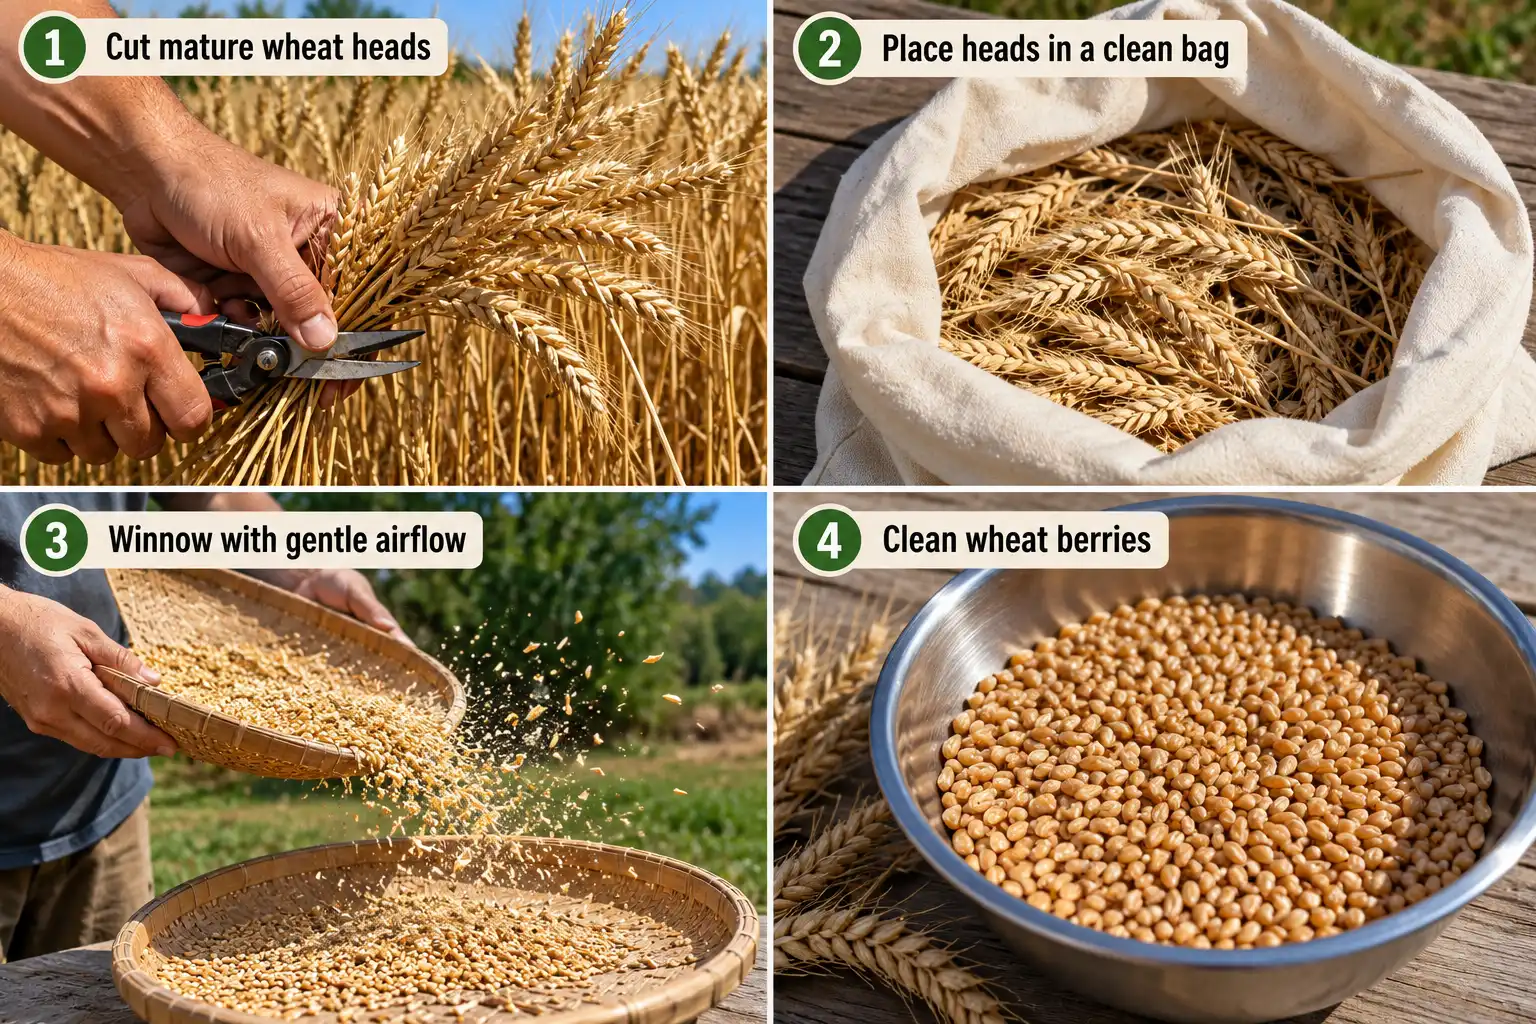
Wheat is harvested by cutting mature stems, separating the grain from the heads, and removing chaff.
Commercial combines perform these operations mechanically. Small garden harvests can be handled with simple equipment.
Step 1: Cut the wheat
Use a sickle or sturdy hand shears.
Cut the stems below the mature grain heads. Keep the heads clean and away from wet soil.
Step 2: Collect and dry the heads
Place cut wheat in a clean, dry, well-ventilated location.
If the crop is not sufficiently dry, allow additional drying before threshing. Avoid piling damp wheat in thick bundles.
Step 3: Thresh the wheat
For a small batch, place dry heads inside a sturdy clean cloth bag.
Gently beat or rub them to release kernels.
Avoid crushing the grain.
Step 4: Winnow the grain
Pour the loosened mixture between clean containers in a gentle breeze or controlled airflow.
The lighter chaff separates from the heavier kernels.
Repeat carefully until most debris is removed.
Step 5: Clean and inspect
Remove remaining plant fragments, damaged kernels, and foreign material.
Do not mix treated planting seed with harvested food grain.
How Should You Dry and Store Wheat Berries?
Store only clean, sufficiently dry grain in a cool location protected from moisture and pests.
Grain that feels hard can still contain enough moisture to support mold during storage.
The University of Minnesota Extension recommends wheat moisture of 14% or less for storage shorter than six months and 13% or less for storage longer than nine months.
University of Georgia guidance recommends still lower moisture for long-term storage in hot, humid southeastern conditions.
Storage procedure
- Confirm that the grain is sufficiently dry for the intended storage period.
- Remove chaff, dust, insects, and damaged kernels.
- Allow grain to cool before sealing containers.
- Transfer dry kernels into clean, food-safe containers.
- Store away from heat, sunlight, and moisture.
- Inspect periodically for condensation, odors, mold, and insects.
If you cannot verify grain moisture, avoid assuming freshly threshed wheat is ready for long-term airtight storage.
Keep wheat intended for future planting separate from wheat stored for food. Label both containers clearly.
How Much Wheat Can You Harvest From a Small Plot?
Wheat yield depends on variety, plant population, growing conditions, disease pressure, and harvest losses.
A useful way to estimate potential grain production is to convert field yield into pounds per square foot.
The USDA Economic Research Service uses 60 pounds as the standard weight of one bushel of wheat.
For an illustrative field yield of 50 bushels per acre:

Divide by 43,560 square feet per acre to estimate the grain yield for smaller areas.
| Growing area | Estimated dry grain at 50 bu/acre |
|---|---|
| 4 × 8 ft bed (32 sq. ft.) | 2.2 lb |
| 10 × 10 ft plot (100 sq. ft.) | 6.9 lb |
| 1,000 sq. ft. | 68.9 lb |
| 1 acre | 3,000 lb |
These are mathematical examples, not predicted garden yields. Actual production may be considerably lower or higher.
Allow for threshing and cleaning losses when estimating usable wheat berries.
Why Is Your Wheat Not Growing Well?
Most wheat establishment and growth problems can be narrowed down by checking seed, moisture, planting depth, and crop stage.
| Symptom | Possible cause | What to check |
|---|---|---|
| Seeds fail to emerge | Low germination, dry soil, excessive depth | Seed viability, moisture, planting depth |
| Seedlings emerge unevenly | Variable seed placement or soil crusting | Row depth and surface condition |
| Plants remain pale | Nutrient shortage, waterlogging, damaged roots | Soil test and drainage |
| Few stems develop | Late sowing, poor establishment, nutrient stress | Plant population and tillering |
| Wheat produces little grain | Heat, drought, disease, poor pollination conditions | Heading and grain-filling conditions |
| Grain heads turn white early | Possible Fusarium head blight or other injury | Head symptoms and recent weather |
| Stems fall before harvest | Lodging from weather, variety characteristics, or excess nitrogen | Stem strength and fertility history |
Do not automatically increase fertilizer whenever wheat turns yellow. Flooded roots, disease, and winter injury can produce similar symptoms.
Check representative plants and the surrounding soil before making a management decision.
FAQs about Grow Wheat
Does wheat need bees or another variety for pollination?
No. Wheat is predominantly self-pollinating, so a single compatible variety can produce grain without bees or a separate pollinator variety. However, temperatures, moisture stress, and disease during flowering can still affect successful kernel development.
Will winter wheat produce grain without cold weather?
Winter wheat generally needs sufficient exposure to cool temperatures to complete vernalization and develop reproductive growth normally. If winter conditions are too warm for a particular variety, heading can be delayed or grain production can suffer.
Does wheat grow back after you cut it?
Wheat can regrow after early vegetative cutting if the growing point remains intact. However, cutting mature plants for grain ends that crop’s harvest cycle. Standard wheat varieties are annual crops and normally require replanting.
Can wheat survive a late spring frost?
Wheat can tolerate some freezing conditions, especially before reproductive growth begins. Once stems elongate and grain heads develop, freezing temperatures pose greater risks. Damage depends on temperature, exposure duration, crop stage, and variety.
Is wheatgrass the same thing as grain wheat?
Wheatgrass is young wheat harvested for its green leaves, often shortly after germination. Wheat grown for berries remains in the ground until mature heads produce hard kernels. The harvest stage and intended product are different.
Can you save harvested wheat berries for planting next year?
Yes, provided the berries remain viable, clean, and properly stored. However, saved seed may carry diseases or unwanted seeds, and its germination can decline. Test a representative sample before planting and confirm variety suitability.
Should you remove all wheat straw after harvesting?
No. Leaving suitable wheat residue can protect the soil surface and help maintain organic matter. However, heavy residue may interfere with subsequent planting or disease management. Adjust residue handling to the next crop and rotation.
Key Points for Your Wheat Crop
Start by selecting winter or spring wheat suited to your growing region. Use viable seed, plant at the recommended depth and population, and manage moisture and nutrients according to crop stage.
For home production, begin with a manageable plot and plan for threshing and grain storage before planting. For field production, use local variety trials, soil tests, and regional planting recommendations to guide decisions.